This past week I decided I was going to figure out how to send text over serial to the 8x8 LED sign my father and I built a few years ago.
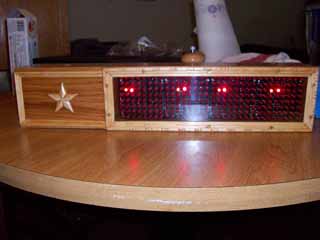
First, a little background on the panels. The printed circuit boards were purchased as part of a kit from a company called Modern Device. The design is quite nice. There are four LED driver chips (STP16C596) that can be programmed over SPI. The nature of the chips enables the panels to be connected in a daisy chain fashion. This greatly simplifies controlling the panels using a microcontroller because any data that is shifted out over SPI to one panel gets shifted into the next panel. Sounds a lot like the behavior of scrolling text, doesn’t it?
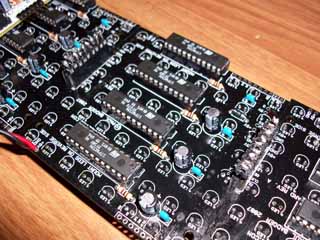
Back of one of the panels.
The LEDs were not included with the Modern Device kit, so we purchased some really nice, ultra-bright LEDs from Mouser.
Along with the 8x8 LED panel kit, we chose to order what Modern Device calls a “Bare Bones Board”, which is really just a small, custom Arduino board. It’s programmed using the Arduino IDE, choosing the “Arduino NG or older w/ ATmega168" option for the board type.
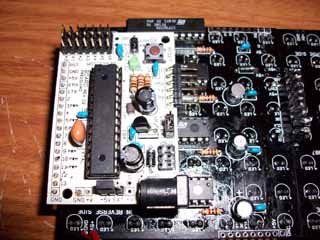
Arduino “Bare Bones Board” attached to panels.
So the summer before my freshman year of college (2008), my father and I soldered together the four LED panels we had purchased. My dad constructed a really neat wooden enclosure for the sign, complete with a plexiglass front and a housing for 4 D cell batteries (also supports 5V AC adapter). Maybe someday he’ll write a blog post on how he designed the enclosure and put it together.
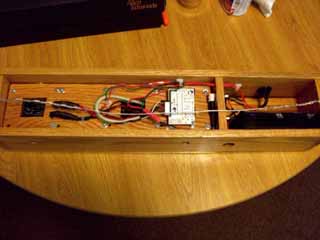
Back of the sign.
I also played with some of the sample Arduino code that Modern Device provided. The code was supposed to take a hard-coded string and scroll it repeatedly across the panels. However, the code was written to only support two panels. When I ran the code on our four panel display, a weird “mirror” effect happened to the text. For example, if I wanted to scroll the string “Hi!”, the four panels would look like this:
| H| i!| H| i!|
So basically, the string would simultaneously scroll across both of the pairs of panels. I spent that summer before my freshman year of college trying to figure out what was going on, but at that point I really didn’t know much about electronics except for Ohm’s and Kirchhoff’s laws and how to solder. So I took the panels to college with the hope that I would learn how to fix them in my classes.
It wasn’t until Spring break of my sophomore year that I decided to dedicate some time to figuring out the scrolling issue. I was halfway through taking the ESE 350: Micrcontrollers & Embedded Systems class at Penn and I had learned a lot about SPI communication. Also, someone on the Internet had released a really sweet-looking Arduino library for the 8x8 LED panels that supposedly supported scrolling up to 8 panels of text, so I was confident I would finally be able to get them working.
Unfortunately, running the new library on the panels resulted in the same weird mirror effect. I decided to take a break from the software side and make sure there was nothing wrong with the hardware of the panels. It turns out that, along with the jumpers connecting the DATA-OUT of each panel to the DATA-IN of the next panel in one direction (which is correct), we had also made the same connections going in the opposite direction. For some reason, this caused the weird mirror effect I described above. As soon as I disconnected the offending jumpers, the text scrolled across all four panels correctly:
I was also really excited because the new 8x8 LED Arduino library also supposedly supported sending new text to the sign in real-time over serial. For this to work, some Arduino code is loaded on the sign that basically listens for special strings over serial (e.g. ESC + T + scroll_speed + length_of_msg + msg) and updates the sign accordingly. Unfortunately, I wasn’t able to get this to work, so I shelved the sign again until I could learn more about programming and serial communication.
Which brings us to last week, when I finally had some more time to work on the sign. The Arduino library for the panels had not been updated, so I decided to see if there was something wrong with the code. Honestly, it was hard to tell. The code did not contain many useful comments and actually contained a few mistakes.
So I decided to write my own code for the Arduino that would listen over serial for something simpler than the commands the library used. I wanted my Arduino sketch to listen for any text over serial that is terminated with a newline character and just display that. So sending a string of “Hello world!\n” would scroll “Hello world!” Simpler, right?
I got it done, and my sketch was just under 100 lines of code (with comments).
So it was the moment of truth: I loaded my Arduino sketch on the sign, the sign reset, and…ARGH still no luck! Sending text strings over serial had no effect on the sign. Well, I guess once again it was time to make sure there were no problems with the hardware side of things.
I found the culprit within 15 minutes. So the Arduino board’s hardware serial pins were pins 0 and 1. These were plugged into a custom cable my dad had made, with the opposite end of the cable plugged into the sign. It looks like we had accidentally plugged the RX and TX serial pins into a few unused pins on the sign panels. I unplugged the cable from the Arduino, bent the RX and TX serial pins down so they would not go into the cable, and plugged the cable back in. My Arduino sketch worked on the first try (always a great feeling!).
I didn’t go back and try the Arduino library again, but I have a feeling it would probably work now. The guy who made the Arduino library also wrote some .NET Windows apps specifically to send text over serial to the sign, but these programs were not open-source and could only send custom text or twitter updates (but I never got it to accept my twitter credentials).
As a final project for the sign (at least for now), and as a primer for my internship this summer at Bump Technologies, I decided to write my own GUI application to send text to the sign over serial. I chose Python for the language since I needed to learn it for my internship and also because it is cross-platform, so it would run not only on my Ubuntu laptop but also on my Dad’s Windows 7 PC.
More specifically, I decided my app should do two things: send custom text and send RSS feed headlines. I won’t go too much into the specifics, but I wrote the app using a library called feedparser to parse the RSS feeds, pySerial to communicate with the sign over serial, and wxpython to put together the GUI. I also wrote some custom code to find all available serial ports (serialscan.py in the repo, see below), and I’m pretty sure it works on both Windows and Linux (not sure about Mac OSX though).
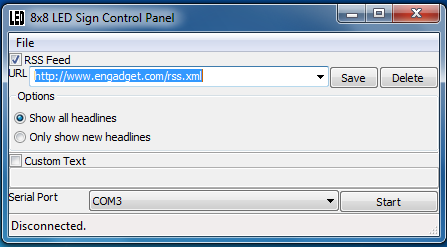
Wxpython-based GUI for controlling 8x8 LED sign, running in Windows 7.
I also took this opportunity to create my first repository on GitHub and practice using git. Both the Arduino code and the Python code for this project are licensed under GNU GPLv3 and can be found at http://www.github.com/kevincon/8x8led. The code could use some more comments and clean-up, and the Python code requires pyserial, wxpython, and feedparser to be installed (see previous paragraph). The Arduino code also requires the main .cpp file from the Arduino library for the panels, and a zip file of it is included in the same folder as my code.
I found Python to be a really fun language to program in. Most things were really simple to implement, and some things I never thought were possible actually are (e.g. you can “pickle” an object and save it in its entirety to a file to be loaded back later). Wxpython was also a pretty good GUI framework to work with, or at least it seemed a lot better than Swing in Java.
Anyway, here’s a video of the sign in action, scrolling headlines from Engadget. I would have recorded more, but the Flip video camera I was using wasn’t working very well:
What do you think? Any ideas on what else the sign should scroll? Some things I thought of to work on in the future:
- Weather conditions
- Movie showtimes
- Stocks
- Sports scores